![]()
![]()
With your TiVo offering a Bash shell prompt over its serial port, let's tap your computer into that flow of bits.
With Bash-over-serial [Hack #30] enabled, your TiVo is spitting bits over its serial port into the ether, just waiting for someone to access its Bash prompt. Your mission, if you choose to accept it, is to get those bits to your computer. Go on, you've already done the hard bits.
On the back of your TiVo is a port labeled "serial," which is just about, but not quite, like the RS-232 serial ports on the back of a PC. The only real difference is the connector; rather than a standard serial port, TiVo's resembles a headphone jack.
|
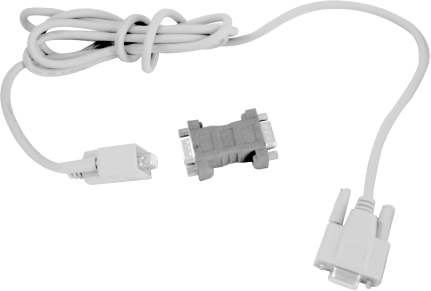
First, let's make sure that you have the right cable to wire your TiVo to your computer. You need to get a hold of the serial control cable that shipped with your TiVo; it has a standard RS-232 serial connector on one end and what looks like a headphone plug on the other (see Figure 3-1). You're also going to need a null modem adapter (also shown in Figure 3-1), available at your local computer or electronics store. Lastly, you may also need a gender bender to get the end that attaches to your serial port to be female.

If you are contemplating connecting your TiVo to your Mac, then you will also need a serial-to-USB adapter, because your Mac does not have any serial ports. I recommend the Keyspan "High Speed" USB Adapter (http://www.keyspan.com/products/usb/USA19W/). Moving forward, I'll assume you are using such an adapter and have the appropriate Macintosh drivers installed.
Now that we have all the hardware we need, let's plug in and get those bits flowing. Plug the headphone-like end of the serial cable into TiVo's serial port. Connect the null modem adapter to the other end, and connect the other end of the null modem adapter to the serial port on the back of your PC. If you are connecting to a Mac, the null modem adapter plugs into your serial-to-USB adapter, which, in turn, plugs into the USB port on your Mac.
And that's it for hardware.
To talk serially to your TiVo and, thereby, the Bash shell, you are going to need the help of a simple terminal program. Use your favorite. If you don't have a favorite, there are a few popular choices: Windows has SecureCRT (http://www.vandyke.com) or the inferior, but preinstalled, Hyperterminal; Macs have ZTerm (http://homepage.mac.com/dalverson/zterm/), which runs under both OS 9 and OS X; and Linux has Minicom (http://packages.debian.org/stable/comm/minicom.html). Any one of these will do just fine.
TiVo is set up to talk at 9,600 baud and 8N1 (that's 8 data bits, 1 stop bit, and no parity bits) with no flow control. Now we'll instruct your terminal program to attach to the right port on your computer and speak the same language.
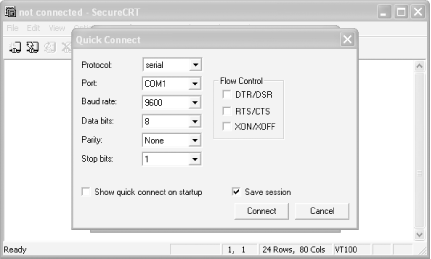
Launching SecureCRT will usually present you a Connect menu; if it doesn't, select File from the Connect menu. Click the Quick Connect toolbar button to bring up a Quick Connect dialog box. Use the same settings as those the TiVo is using (see Figure 3-2): Protocol should be serial, Port is the COM (that's communications or serial port) to which you have the serial cable connected, Baud rate is 9,600, Data bits is 8, Parity is None, and Stop bits is 1. Also, uncheck all of the Flow Control boxes.

Click the Connect button and skip to Section 3.6.4, later in this hack.
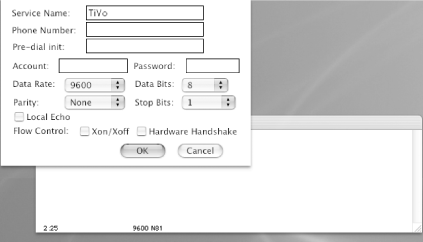
Launch ZTerm on your Mac and select Settings from the Connection menu. In the resultant dialog box, shown in Figure 3-3, set things the way TiVo expects them: 9,600 Data Rate, 8 Data Bits, no Parity, and 1 Stop Bit. Uncheck both Flow Control boxes to turn off all hardware flow control.

Click the OK button and skip to Section 3.6.4 of this hack.
Setting up Minicom is just as simple as setting up the terminal programs for Windows and Macintosh. As root, fire up Minicom like so:
$ sudo minicom -s
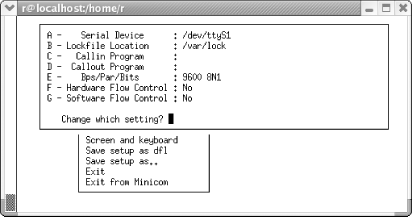
You'll be prompted for your password, after which you'll be operating as root so that you'll have permission to modify and verify the serial port's settings. From the Minicom menu, select Serial Port Setup (see Figure 3-4) and configure the port to have the same options as TiVo's: set Serial Device to the /dev/tty device into which the serial cable is plugged (in my case, /dev/ttyS1, serial port 2), Bps/Par/Bits to 9,600 8N1, and both Hardware and Software Flow Control to No.

Select Exit and save the settings. Minicom should drop you right into the terminal.
Now, turn on your TiVo (or, if it's already on, turn it off and back on) and wait through the usual "please wait a few more seconds" message appearing on your television screen. When TiVo has finished booting, you should see a shell prompt in your terminal program on your PC. If you don't, hit the Enter/Return key a few times to get TiVo's attention. If all has gone to plan, you'll see:
bash-2.02#
When you hit Enter, the cursor should move to the next line, showing another prompt, like so:
bash-2.02#
bash-2.02#
If the line wrapping appears at all jumbled—the next prompt is preceded by some amount of whitespace—clear it up by instructing Bash to try a different newline strategy:
bash-2.02# stty echo
If things don't go well and you don't see a prompt at all, start backtracking:
Are you sure your terminal settings are correct?
Are your cables in snugly on both ends? Did you include all the bits and bobs—the null modem adapter, serial-to-USB adapter (if on a Mac), etc.?
Did you remember to enable the Bash shell over the serial port [Hack #30]?
Did you add the Bash line (/bin/bash --login < /dev/ttyS3 >& /dev/ttyS3 &) to both rc.sysinit files if you have both a partition 4 and partition 7?
|
|
| Top |