|
|
|
1.3 Solutions, Projects, and DependenciesRemember that solutions do not just contain projects—they also hold information on the relationships between those projects. So once you have the projects you require in your solution, you must make sure Visual Studio .NET knows about the dependencies between them so that the projects will be built correctly. With .NET projects, this is done by setting up references from one project to another. 1.3.1 Adding References to ProjectsAll projects have a list of references, which is shown in the Solution Explorer directly beneath the project node. (See Figure 1-12.) Each item in this list represents a reference to some external component that your project uses. Figure 1-12. References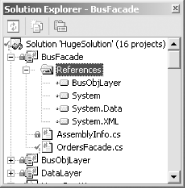 These external components can be .NET assemblies, COM components, or other projects within the same solution. With a .NET project, unless you add an external component to the References list, you will not be able to use that component's types in your project.
Adding a reference can serve up to four purposes:
To add a reference to your project, right-click on it in the Solution Explorer and select Add Reference. (You can also select Add Reference from the context menu for the References node in the Solution Explorer.) This brings up the Add Reference dialog box, which is shown in Figure 1-13. There are three tabs on this dialog, one for .NET references, one for COM references, and one for Project references. The .NET tab and the COM tab enable you to add a reference to a .NET component and a COM component, respectively. Both present a list of installed components, but you can also use the Browse... button to import a specific component. The Project tab shows the projects in the solution that you can add as a Project reference. (Not all projects will be shown—for example, a project cannot have a reference to itself. Also, some project types do not produce output that can meaningfully be referenced from other projects—you cannot add a reference to a Database project or to a Setup and Deployment project.) The COM tab simply lists all registered components on the local machine. .NET components provide VS.NET with more of a challenge, because, unlike COM components, .NET components do not need to be registered before they can be used, which makes it hard to build a complete list. VS.NET builds the list of available .NET components by looking in certain directories. By default, it looks in the install directory for the .NET Framework (%SystemRoot%\Microsoft.NET\Framework\vX.X.XXXX), but it will also look in any directories listed in a certain registry key.[7] So if you want extra components to be displayed in this dialog, add your own directories under that registry key.
Figure 1-13. The Add Reference dialog box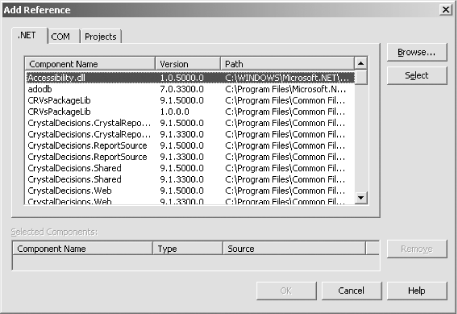 1.3.1.1 The Copy Local propertyLike most items in the Solution Explorer, references have properties that can be shown in the Properties pane (F4). Most of the properties are read-only and show details such as the path and version information. However, with a reference to a .NET component, you can change one property: the Copy Local property. If this is set to True, Visual Studio .NET will copy the component into the project's build directory. The default setting for the Copy Local property depends on whether the reference is stored in the GAC (the Global Assembly Cache—the place where shared system components are stored). Such components are available to all applications without the need for copying files, so when you add a reference to a component that is in the GAC, Visual Studio .NET sets this property to false. For all other .NET component references, it will set this property to true.
The behavior when the Copy Local flag is set to true is subtly different depending on whether the reference is to an external component or to another project in the solution. For external components, the copy is made when you create the reference. If the external component changes, or is even removed completely, Visual Studio .NET will not notice, and the project will carry on using the copy. If you care about the change, you must delete the reference and recreate it in order to get a new copy of the component. (Or you can just delete the copy from the build directory—this will cause VS.NET to make a new copy.) However, if the reference is to another project in the solution, VS.NET will make a new copy every time the project being referred to is rebuilt.
1.3.1.2 Adding references to COM componentsWhen you add a reference to a COM component in a .NET project, VS.NET will either find or create a .NET interop assembly. Interop assemblies are .NET wrapper components that enable a .NET project to use COM components. If there is a primary interop assembly registered on your system for the COM component, VS.NET will just use that. (Primary interop assemblies are wrapper assemblies generated with tlbimp.exe that are signed and distributed by the vendor of the COM component. Their purpose is to avoid a proliferation of wrappers by providing one definitive wrapper for a given COM component. VS.NET will look for primary interop assemblies in the GAC.) If no primary interop assembly is registered, VS.NET automatically creates a new interop assembly using the tlbimp.exe command-line tool and copies it into your build directory.
1.3.1.3 Adding references to other projectsWith references to other projects, Visual Studio .NET automates two things: it automatically rebuilds dependent projects when necessary, and it automatically updates local copies after each change. For all other types of references, you are responsible for doing these jobs yourself. Table 1-6 summarizes the behavior of the various types of references.
You should use project references whenever possible. It is technically possible to create a nonproject reference to the output of another project—you just add a new .NET reference and browse for the DLL. But you should avoid this because you lose all the advantages of a project reference. Project references make team development easier, since projects included in the same solution will be guaranteed to be present on each development machine (since these projects will be part of the checkin/checkout when working with the solution from source control). They also allows VS.NET to detect and disallow circular references. 1.3.2 Project Dependencies and Build OrderWhile adding a project reference automatically adds a dependency, you can also manage dependencies directly. Dependencies are solution-scoped properties that affect the build order of the projects in your solution. If Project A depends on Project B, VS.NET will always make sure Project B has been built before building Project A. If you want to see the current build order, you can right-click on the solution in the Solution Explorer and select Project Build Order. This will show the Build Order tab of the Project Dependencies dialog as shown in Figure 1-14. The build order tab does not let you change the build order, because the build order is determined by the dependencies. You can view or edit your dependencies by clicking on the Dependencies tab (see Figure 1-15). Figure 1-14. Build Order tab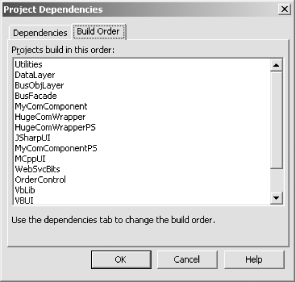 Figure 1-15. Dependencies tab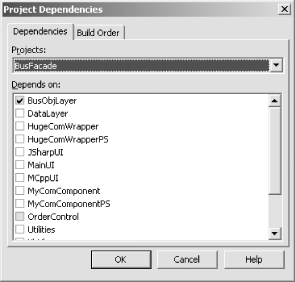
Once
all of your references are in place, you can build
your solution. The simplest way to do this is with Build
1.3.3 Configuration ManagerIt is common to want to be able to build a given project in more than one way. For example, at development time, you want to build in debugging information, but you would not normally want to build the version you ship this way. You may also need to build special versions with extra logging enabled to help you diagnose a problem on a live system. To enable this, Visual Studio .NET allows projects and solutions to have a number of different configurations. Each configuration can specify its own settings for any property of any project. By default, Visual Studio .NET creates Debug and Release
configurations for all projects and solutions. The Debug
configuration sets up projects to compile with full debugging
information and no optimization, while the Release build does the
opposite. You can modify these configurations or create new
configurations as needed. For example, you might add unit testing
code to your project that is compiled only in special unit test
configurations. You can also create configurations that leave out
certain projects. For example, Setup and Deployment projects take a
fairly long time to build, but you usually want to build those only
occasionally. In fact, a new Setup and Deployment project will, by
default, be configured not to build in either the Debug or the
Release configuration. So you might add a third configuration that
builds everything that the Release configuration builds and also
builds the Setup project.Solution configurations are set up using the
Configuration Manager dialog box. You can get to the Configuration
Manager dialog box by right-clicking on the solution in the Solution
Explorer and selecting Configuration Manager or by selecting Build
Figure 1-16. The Configuration Manager dialog box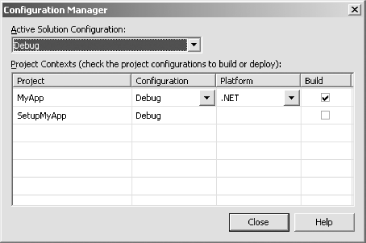 You can choose which configuration's settings the Configuration Manager dialog box displays with the Active Solution Configuration drop-down list. In addition to showing all of the available configurations, this list has two special entries, <edit> and <new>. The <edit> entry allows you to either remove or rename a configuration. The <new> entry allows you to create a new configuration, displaying the dialog shown in Figure 1-17. We can use this to create a new configuration in which the deployment project, SetupMyApp, will be built, giving it an appropriate name such as InstallableRelease. Figure 1-17. New Solution Configuration dialog box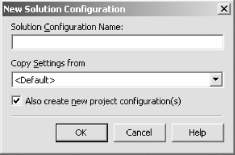 As well as allowing you to give your new configuration a name, the New Solution Configuration dialog box also allows you to select the configuration from which to copy settings. (The special <Default> entry shown in Figure 1-17 instructs Visual Studio .NET not to copy settings from any existing configuration, but to use default values instead.) In this case, when we just want to build an installable application, we would normally choose to copy settings from the Release configuration. The New Solution Configuration dialog box also has an "Also create new project configuration(s)" checkbox. This tells the IDE to create new configurations for each project—both projects and solutions can have per-configuration settings. If you are creating a new configuration merely to control which projects are built, this box should be unchecked. For example, in our InstallableRelease configuration, we will want the projects to be built with exactly the same settings as they use with the Release configuration, so there is no need to create new per-project settings. Figure 1-18 shows a new configuration that was created without new project configurations. Notice that although the newly created InstallableRelease solution configuration is selected, each individual project's Configuration column shows that the project settings from the Release configuration are being used. The only difference between this solution configuration and the Release configuration shown in is that we are now building the setup project as well as the application—both items are checked in the Build column. Figure 1-18. Including a setup project in a configuration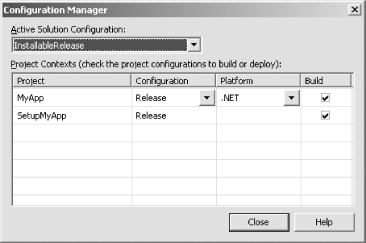 Disabling the creation of new per-project configuration settings is appropriate when you just want to control which projects are built. However, if you want your new solution configuration to build the projects in a different way, you will need to create a new set of per-project settings. Per-project configuration settings contain information such as whether debug information is required, which conditional compilation flags are set, and what level of optimization the compiler should use. A solution's configuration information really does nothing more than define which projects should be built and which project configurations should be used. By default, a newly created solution configuration either will use its own newly created set of project configurations or will use the same project configurations as the solution configuration on which it was based, depending on whether the Create New Project Configurations checkbox was checked. However, it is possible to create a solution configuration that uses a different project configuration for each individual project. You could use this to create a special diagnostic build of an application in which all of the projects are built in their Release configurations with the exception of one troublesome component. Figure 1-19 shows how the Configuration Manager might look for this kind of configuration. Figure 1-19. A solution using multiple project configurations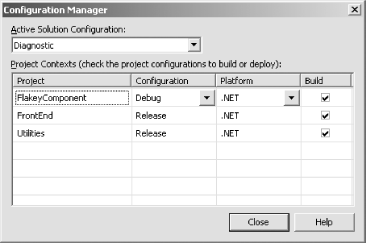 In this example, our solution has three projects. Figure 1-19 is showing a solution configuration called Diagnostic. It has chosen to build all three projects, but as the Configuration column shows, two will be built using Release settings, while the FlakeyComponent project is to be built with Debug settings. 1.3.4 Manual BuildingWhen you select Build Building occurs automatically for .NET projects when you start the
debugger (F5). (With unmanaged projects, you will be asked if you
want to rebuild if you change your project and attempt to run it
without rebuilding it first.) Visual Studio .NET 2003 allows you to
change how much is built for .NET projects—by default, it will
build all projects (although if the projects have not been changed,
this will be relatively quick, since the compilers will detect that
nothing has changed). However, you can elect to have only the Startup
project (the one that runs when you hit F5) rebuilt, along with any
projects it depends on, rather than building everything in the
solution. You can configure this in the Tools 1.3.5 Automated BuildingSo far, all the techniques we have looked at for building projects and solutions require a developer to be seated in front of a running copy of Visual Studio .NET. However, you may automate your builds, that is, launch a build without human intervention. For example, many development teams run a nightly build. (Nightly builds are a great way of making sure that integration issues come out of the woodwork sooner rather than later, as well as making sure that there is always a "latest version" to run tests against.) It would be unreasonable to expect some hapless employee to stay around until midnight every night just to launch the build (even if he were the last person to break the build), so the ability to start a build automatically is important. The simplest way to automate your build is to create a .bat file with the following command line in it: devenv /build Debug /out builderrors.log "MySolution.sln" If this .bat file is placed in your solution directory, it will build the Debug configuration of the solution and send any errors to the builderrors.log file. In conjunction with the Windows "at" scheduling service, this is all you need to perform an automated, scheduled build. (This requires the devenv executable to be on the path, of course. Alternatively, you could hardcode the path into the batch file. The devenv executable lives inside the Common7\IDE subdirectory of the Visual Studio .NET installation directory.)
You can pass other useful command-line switches to devenv. You can use the /rebuild switch to cause a clean and then a build or use /clean to clean out extraneous build files. You can also use the /project switch to build a specific project within a solution. Using a simple batch file in conjunction with the Windows task scheduler to run your nightly build provides enough functionality for many solutions. In theory, you could further customize the build process using the automation model built into VS.NET (see Chapter 8 on macros). devenv provides the /command switch, which enables you to invoke any built-in command from the command line and to also invoke macros. Unfortunately, running macros in this way will have the unhelpful side effect of opening the Visual Studio .NET user interface and leaving it open even after the macro has finished. This means that, in practice, you cannot usefully invoke macros as part of an automated build. But, of course, you can always add extra lines to the .bat file to run other programs if you need to perform work not supported by VS.NET as part of your build. 1.3.5.1 External build toolsMany organizations do not use Visual Studio .NET to perform their automated builds, preferring command-line tools such as NAnt (http://nant.sourceforge.net/) and continuous integration managers such as Draco ( http://draconet.sourceforge.net ). However, this does not necessarily mean abandoning VS.NET altogether. It is common practice for individual developers to work with the VS.NET build systems on their own machine, with the external tools being used only on the build machines. To help make this easier, NAnt ships with a utility called SLiNgshoT that enables NAnt build files to be generated from VS.NET solutions and vice versa. 1.3.6 Build EventsYou can instruct VS.NET to perform custom actions before or after a build occurs. (VS.NET 2002 supports Build Events only in C++ projects. VS.NET 2003 supports this feature in all languages other than VB.NET.) Build Events are used to run external tools as part of the build process. For example, ATL projects exploit this feature to run the COM component registration utility (regsvr32.exe) when a COM component is built. In C# or J# projects, you can configure Build Events from the project property pages. (You can show these by selecting the project in the Solution Explorer and pressing Shift-F4 or by selecting Properties from the project's context menu.) In the panel on the left, expand the Common Properties folder and select the Build Events item, as shown in Figure 1-20. Figure 1-20. Build Events for C# and J# projects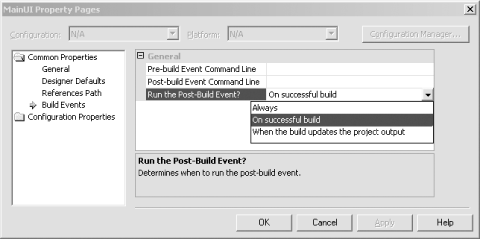 The property grid shows three entries for Build Events. Two let you specify the custom actions to be invoked: one before the build starts and one after the build finishes. In both cases, you supply a command line to be executed as the custom action. The final property lets you select when to perform the post-build action. By default, it will be run only if the project builds successfully. However, as Figure 1-20 shows, you may also specify that the action Always occurs (i.e., it happens whether the build succeeds or not). You can also select "When the build updates the project output". This means that if the user rebuilds the solution, the action will be run only if VS.NET concludes that the project needs to be rebuilt (because it has changed). C++ projects are built in a slightly different way from C# and J# projects, so Build Events work slightly differently. As before, they are configured with the project's property pages. But C++ projects categorize build settings slightly differently. Instead of a single Build Events item, there is a Build Events folder containing three items: Pre-Build Event, Pre-Link Event, and Post-Build Event. Each of these allows three properties to be configured, as Figure 1-21 shows. Figure 1-21. Build Events for C++ projects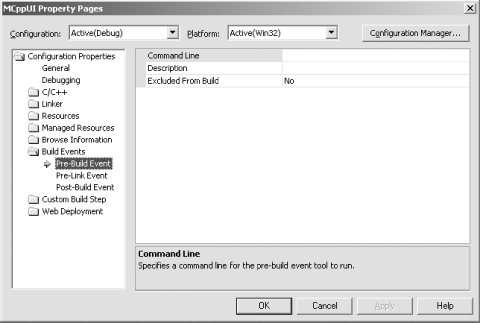 As before, each Build Event can have a command line associated with it. The main difference with C++ projects is that there is an extra event: the Pre-Link Event. This occurs after compilation has finished but before linking occurs. Unlike with C# and J# projects, in a C++ project you have no choice about when the event occurs. The Pre-Link and Post-Build custom actions will be run whenever successful compilation and linking occurs. (And they will not be run if VS.NET determines that no changes have been made to the project.) Also, C++ projects allow a description for each event to be supplied. This text will be written to the Output window when the action is executed. The Excluded from Build option allows you to disable the custom action in specific configurations.
|
|
|
|