Now that we've explored the basic principles of ActionScript, let's apply those principles in the context of a real Flash movie. We'll start our applied study of Flash programming by creating a multiple-choice quiz, using very simple programming techniques, most of which you've already learned. We'll revisit our quiz in later chapters to see how it can be improved after learning more advanced programming concepts. We'll eventually make the code more elegant so that it's easier to extend and maintain, and we'll add more features to our quiz so that it can easily handle any number of questions.
The finished .fla file for this quiz can be found in the online Code Depot, cited in the Preface. This is a lesson in Flash programming, not Flash production. I assume that you are already comfortable creating and using buttons, layers, frames, keyframes, and the Text tool. If not, consult the Flash Help documentation. The quiz shows a real-world application of the following aspects of ActionScript programming:
Variables
Controlling the playhead of a movie with functions
Button event handlers
Simple conditionals
Text field objects used for on-screen display of information
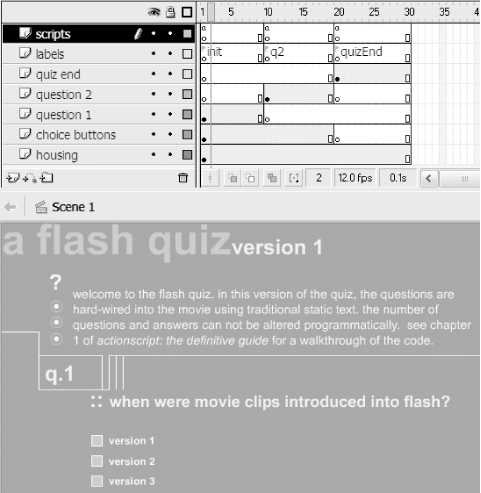
Our quiz, part of which is shown in Figure 1-4, will have only two questions. Each question comes with three multiple-choice answers. Users submit their answers by clicking the button that corresponds to their desired selections. The selections are recorded in a variable that is later used to grade the quiz. When all the questions have been answered, the number of correct answers is tallied, and the user's score is displayed.
When building Flash movies, it's important to organize your content into manageable divisions by keeping different content elements on individual layers. Layering content is a good production technique in general, but it is essential in Flash programming. In our quiz, and in the vast majority of our scripted movies, we'll keep all our timeline scripts on a single isolated layer, called scripts. I keep the scripts layer as the first one in my layer stack so that it's easy to find.
We'll also keep all our frame labels on a separate layer, called (surprise, surprise) labels. The labels layer should live beneath the scripts layer on all your timelines. In addition to these two standard layers (scripts and labels), our quiz movie has a series of content layers on which we'll isolate our various content assets.
Start building your quiz by creating and naming the following layers
(using Insert ![]() Layer) and arranging them in this
order:
Layer) and arranging them in this
order:
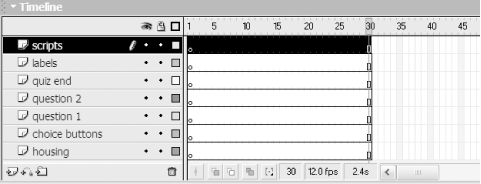
Now add 30 frames to each of your layers (by highlighting 30 frames
in the timeline and choosing Insert ![]() Frame or F5).
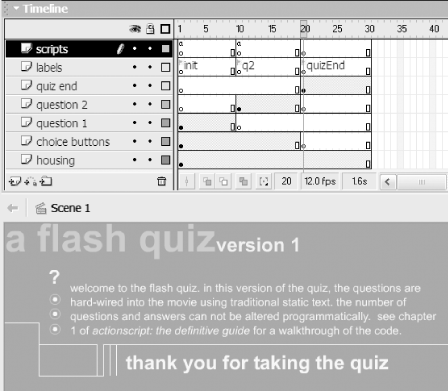
Your timeline should look like the one in Figure 1-5.
Frame or F5).
Your timeline should look like the one in Figure 1-5.
Before we get to the scripts that run the quiz, we need to set up the questions and the interface that will let the user progress through the quiz.
Follow these steps to create the questions and quiz title:
With frame 1 of the housing layer selected, use the Text tool to type your quiz title directly on the Stage.
At frame 1 of the question 1 layer, add the question number "1" and the text for Question 1, "When were movie clips introduced into Flash?" Leave room for the answer text and buttons below your question.
Below your question text (still on the question 1 layer), add the text of your three multiple-choice answers: "Version 1," "Version 2," and "Version 3," each on its own line.
We'll use Question 1 as a template for Question 2.
Select the first frame of the question 1 layer
and choose Edit ![]() Copy Frames (not Edit
Copy Frames (not Edit
![]() Copy).
Copy).
Select frame 10 of the question 2 layer and
choose Edit ![]() Paste Frames (not Edit
Paste Frames (not Edit
![]() Paste). A duplicate of your first question appears
on the question 2 layer at frame 10.
Paste). A duplicate of your first question appears
on the question 2 layer at frame 10.
To prevent Question 1 from appearing behind Question 2, add a blank
keyframe at frame 10 of the question 1 layer
using Insert ![]() Blank Keyframe.
Blank Keyframe.
Back on frame 10 of the question 2 layer, change the question number from "1" to "2" and change the text of the question to, "When was MP3 audio support added to Flash?" Change the multiple-choice answers to "Version 3," "Version 4," and "Version 5."
Our questions are almost complete, but we must add the buttons the user will press to answer each question:
Create a simple button symbol (Insert ![]() New Symbol
New Symbol
![]() Button) that looks like a checkbox or radio button
and measures no higher than a line of text (see the buttons in Figure 1-4).
Button) that looks like a checkbox or radio button
and measures no higher than a line of text (see the buttons in Figure 1-4).
At frame 1 of the choice buttons layer, next to your three Question 1 answers, place three instances of your checkbox button.
Select the topmost button (next to the first answer), and, using the Property inspector, set the <Instance Name> to choice1_btn.
Repeat step 3 to name the remaining two answer buttons choice2_btn and choice3_btn (from top to bottom).
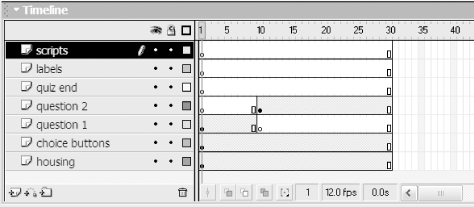
Figure 1-6 shows how your timeline will look after you've added the two questions to the quiz. Notice that we use frames on the timeline to represent so-called application states. Each "screen" of the quiz application gets its own frame. Later we'll add labels to the question frames and see how this facilitates navigation between frames within our program, allowing us to display the desired state — in this case, the appropriate question — easily.
Our first order of business in our quiz script is to create the variables we'll use throughout our movie.
Once our variables are defined, we invoke the stop( ) function to keep the user paused on the first frame (where the quiz starts).
For more complex situations, we may also set the initial state of our application by calling functions in preparation for the rest of the movie. This step is known as initialization. A function that starts processes in motion or defines the initial conditions under which a system operates is traditionally named init.
Before attaching the quiz's init code, shown in Example 1-1, to frame 1 of the scripts layer, let's examine what it does.
// Init main timeline variables
var q1answer;          // User's answer for question 1
var q2answer;          // User's answer for question 2
var totalCorrect = 0;  // Counts number of correct answers

// Stop the movie at the first question
stop( );
Line 1 of our init sequence is a comment. Comments are notes that you add to your code to explain what's going on. A single-line comment starts with two forward slashes and (preferably) a space, which is then followed by a line of text:
// This is a comment
Notice that comments can be placed at the end of a line, following your code, like this:
var x = 5; // This is also a comment
Line 2 of Example 1-1 creates a variable named q1answer. Recall that to create a variable we use the var keyword followed by a variable name, as in:
var favoriteColor;
So, the second through fourth lines of our code declare the variables we'll need, complete with comments explaining their purpose:
q1answer and q2answer will contain the value of the user's answer (1, 2, or 3, indicating which of the three multiple-choice answers was selected for each question). We'll use these values to check whether the user answered the questions correctly.
totalCorrect will be used at the end of the quiz to tally the number of questions that the user answered correctly.
Take a closer look at Line 4 of Example 1-1:
var totalCorrect = 0; // Counts number of correct answers
Line 4 performs double duty; it first declares the variable totalCorrect and then assigns the value 0 to that variable using the assignment operator, =. We initialize totalCorrect to 0 because the user hasn't answered any of the questions correctly at the beginning of the quiz. The other variables don't need default values because they are set explicitly during the quiz.
After our variables have been defined, we call the stop( ) function, which halts the playback of the movie at the current frame — in this case, frame 1 — where the quiz begins:
// Stop the movie at the first question
stop();
Observe, again, the use of the comment before the stop( ) function call. That comment explains the intended effect of the code that follows.
|
Now that you know what our init code does, let's attach it to frame 1 of our quiz movie's scripts layer:
Select frame 1 of the scripts layer.
Make sure you're using Expert Mode, which can be set as a permanent preference via the pop-up Options menu in the top right corner of the Actions Panel.
In the right side of the Actions panel, type the init code as shown earlier in Example 1-1.
Variable Naming StylesBy now you've seen quite a few variable names, and you may be wondering about the capitalization. If you've never programmed before, a capital letter in the middle of a word, as in firstName, or totalCorrect, may seem odd. Capitalizing the second word (and any subsequent words) of a variable name visually demarcates the words within that name. We use this technique because spaces and dashes aren't allowed in a variable name. But don't capitalize the first letter of a variable name—conventionally, an initial capital letter is used to name object classes, not variables. If you use underscores instead of capital letters to separate words in variables, as in first_name and total_correct, be consistent. Don't use firstName for some variables and second_name for others. Use one of these styles so that other programmers will find your code understandable. In some languages, variable names are case-sensitive, meaning that firstName and firstname are considered two different variables. ActionScript, however, treats them as the same thing, though it's bad form to use two different cases to refer to the same variable. If you call a variable xPOS, don't refer to it elsewhere as xpos. Always give your variables and functions meaningful names that help you remember their purpose. Avoid meaningless names like foo, and use single-letter variables, such as x or i, only for simple things, such as the index (i.e., counting variable) in a loop. Don't confuse x and y (as used in our introductory examples, without an underscore) with _x and _y. Whereas x and y are arbitrary variable names chosen by the programmer, _x and _y are built-in properties that represent the horizontal and vertical position of, for example, a movie clip. See MovieClip._x in the Language Reference for details. Some kinds of data in ActionScript have a recommended suffix of the form _suffix (see Table 2-1 in Chapter 2). For example, movie clips are indicated by the suffix _mc, text fields by _txt, and buttons by _btn. For clarity, add these to the end of your variable names, as in: ball_mc, or submit_btn. |
We've completed our quiz's init script and built our questions. We will now add some frame labels to help control the playback of our quiz.
In order to step the user through our quiz one question at a time, we've separated the content for Question 1 and Question 2 into frames 1 and 10. By moving the playhead to those keyframes, we'll create a slide show effect, where each slide contains a question. We know that Question 2 is on frame 10, so when we want to display Question 2, we can call the gotoAndStop( ) function like this:
gotoAndStop(10);
which causes the playhead to advance to frame 10, the location of Question 2. A sensible piece of code, right? Wrong! Whereas using the specific number 10 with our gotoAndStop( ) function works, it isn't flexible (using literals in this manner is called hardcoding, which is often ill-advised). If, for example, we added five frames to the timeline before frame 10, Question 2 would suddenly reside at frame 15, and our gotoAndStop(10) command would not bring the user to the correct frame. To allow our code to work even if the frames in our timeline shift, we use frame labels instead of frame numbers. Frame labels are expressive names, such as q2 or quizEnd, attached to specific points on the timeline.
|
Let's add all the labels we'll need for our quiz now, so we can use them later to walk the user through the quiz questions:
On the labels layer, select frame 1.
In the Property inspector, for <Frame Label>, type init.
At frame 10 of the labels layer, add a blank keyframe.
In the Property inspector, for <Frame Label>, type q2.
At frame 20 of the labels layer, add a blank keyframe.
In the Property inspector, for <Frame Label>, type quizEnd.
Our questions are in place, our variables have been initialized, and our frames have been labeled. If we were to test our movie now, we'd see Question 1 appear with three answer buttons that do nothing when clicked, and we'd have no way for the user to get to Question 2. We need to add some code to the answer buttons so that they will advance the user through the quiz and keep track of answers along the way.
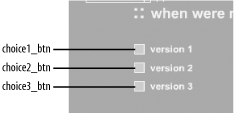
Recall that we named our button instances choice1_btn, choice2_btn, and choice3_btn, as shown in Figure 1-7.
To make the Question 1 buttons store the user's answer and display the next question when pressed, we'll use the code in Example 1-2.
// Code executed when button 1 is pressed.
choice1_btn.onRelease = function ( ) {
  this._parent.q1answer = 1;
  this._parent.gotoAndStop("q2");
};

// Code executed when button 2 is pressed.
choice2_btn.onRelease = function ( ) {
  this._parent.q1answer = 2;
  this._parent.gotoAndStop("q2");
};

// Code executed when button 3 is pressed.
choice3_btn.onRelease = function ( ) {
  this._parent.q1answer = 3;
  this._parent.gotoAndStop("q2");
};
The code for each button consists of two statements that are executed only when a mouseclick is detected. In natural language, the code for each button says, "When the user clicks this button, make a note that he chose answer 1, 2, or 3; then proceed to Question 2." Let's dissect how it works, concentrating on the first button only:
choice1_btn.onRelease = function ( ) {
  this._parent.q1answer = 1;
  this._parent.gotoAndStop("q2");
};
Line 1 is the beginning of an event handler. It specifies:
The name of the button that should respond to the event: choice1_btn
The name of the event to which the button should respond: onRelease (which occurs when the user clicks and releases the mouse over the button)
The function to run when the event actually happens: function ( ) { ... }
|
The opening curly brace ({) marks the beginning of the block of statements that should be executed when the onRelease event occurs. The end of the code block is marked by a closing curly brace (}), which is the end of the event handler's callback function.
choice1_btn.onRelease = function ( ) {
  ...
}
The event handler waits patiently for the user to click button 1. When the button is clicked, Flash executes our callback function, which contains the following two lines:
  this._parent.q1answer = 1;
  this._parent.gotoAndStop("q2");
The first line sets our variable q1answer to 1 (the other answer buttons set it to 2 or 3). The q1answer variable stores the user's answer for the first question. However, as a matter of good form, we provide not just the name of the q1answer variable, but also its location in relation to the button. The expression this._parent means "this button's parent movie clip" or, synonymously, "the movie clip that contains this button." The keyword this represents the button itself, while _parent is the button's parent movie clip. So, the complete statement this._parent.q1answer = 1 means, "In this button's parent movie clip, set the variable q1answer to 1." If you're new to this syntax, you may find it overly verbose. However, as we'll learn in Chapter 2, every variable has a home (usually a movie clip), and we're normally required to provide not only a variable's name but also its location (e.g., this._parent.q1answer, as opposed to just q1answer).
Once we have recorded the user's answer for Question 1 in q1answer, we advance to Question 2 via line 2 of our callback function:
this._parent.gotoAndStop("q2");
Line 2 calls the gotoAndStop( ) function, passing it the frame label "q2" as an argument, which advances the movie's playhead to the frame q2, where Question 2 appears. However, once again we must specify, in relation to the button clicked, precisely which movie clip's playhead should move to the label q2. Just as with our variable, we want to control the button's parent movie clip, so we preface our gotoAndStop( ) function call with this._parent.
Each of our answer buttons performs the same basic tasks (sets q1answer and displays frame q2). Hence, the three button event handlers differ in only two ways:
Each specifies a different button instance name (choice1_btn, choice2_btn, choice3_btn).
Each sets a different value for q1answer, recording the user's actual answer to the question.
To apply the event handlers to the Question 1 buttons, enter the code from Example 1-2 into your script, below the existing init code on frame 1 of the scripts layer. When you're done, the Actions panel for frame 1 of the scripts layer should resemble Figure 1-8.
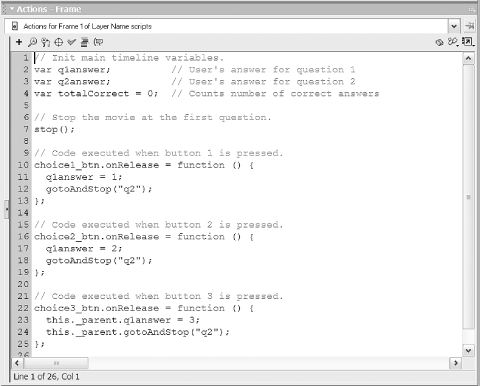
That takes care of the code for the Question 1 buttons. Let's move on to the Question 2 buttons. They work exactly like the Question 1 buttons, but they must record the user's selection for Question 2 instead of Question 1, and they must display the quiz-end screen, not the next question. Happily, we can reuse the existing buttons in our movie. We must change only the event handler functions that run when the buttons are pressed. To redefine the event handlers for the Question 2 buttons, follow these steps:
At frame 10 of the scripts layer, add a blank keyframe.
With frame 10 of the scripts layer still selected, type the code in Example 1-3 into the Actions panel.
Any script placed on a keyframe in the timeline is automatically executed when the playhead enters that frame. Hence, when Flash displays frame 10, our new button code will be applied to the Question 2 buttons.
// Code executed when button 1 is pressed.
choice1_btn.onRelease = function ( ) {
  this._parent.q2answer = 1;
  this._parent.gotoAndStop("quizEnd");
};

// Code executed when button 2 is pressed.
choice2_btn.onRelease = function ( ) {
  this._parent.q2answer = 2;
  this._parent.gotoAndStop("quizEnd");
};

// Code executed when button 3 is pressed.
choice3_btn.onRelease = function ( ) {
  this._parent.q2answer = 3;
  this._parent.gotoAndStop("quizEnd");
};
Our Question 2 button event handlers are the same as they were for Question 1, except that we use the variable q2answer instead of q1answer, because we want the buttons to keep track of the user's response to Question 2. And we use "quizEnd" as the argument for our gotoAndStop( ) function to advance the playhead to the end of the quiz (i.e., the frame labeled quizEnd) after the user answers Question 2.
Having just added event handlers to six buttons, you will no doubt have noticed how repetitive the code is. The code on each button differs from the code on the others by only a few text characters. That's not exactly efficient programming. Our button code cries out for some kind of centralized command that records the answer and advances to the next screen in the quiz. In Chapter 9, we'll see how to centralize our code with functions.
Our quiz is nearly complete. We have two questions and an answer-tracking script that lets the user answer the questions and progress through the quiz. We still need a quiz-ending screen where we score the quiz and tell the user how well he fared.
To build our quiz-end screen, we need to do some basic Flash production and some scripting. Let's do the production first:
At frame 20 of the question 2 layer, add a blank keyframe. This prevents Question 2 from appearing behind the contents of our quiz-end screen.
At frame 20 of the choice buttons layer, add a blank keyframe. This prevents our buttons from appearing behind the contents of our quiz-end screen.
At frame 20 of the quiz end layer, add a blank keyframe.
While you're still on that frame, put the following text on the Stage: "Thank you for taking the quiz." Make sure to leave some space below for the user's score.
At frame 20 of the scripts layer, add a blank keyframe.
That takes care of the production work for our quiz-end screen. Your end screen should look something like the one shown in Figure 1-9.
Now let's work on the quiz-end script. When the playhead lands on our quizEnd frame, we want to calculate the user's score. We need a calculation script, shown in Example 1-4, to execute when the playhead reaches frame 20. Select frame 20 of the scripts layer; then type the code from the example into the Actions panel.
// Tally up user's correct answers.
if (q1answer =  = 3) {
  totalCorrect = totalCorrect + 1;
}
if (q2answer =  = 2) {
  totalCorrect++;
}

// Create an onscreen text field do display the user's score.
this.createTextField("totalOutput_txt", 1, 150, 200, 200, 20);

// Show the user's score in the onscreen text field.
totalOutput_txt.text = "Your final score is: " + totalCorrect + "/2.";
In the calculation script, we first determine the user's score, and then we display that score on the screen. Lines 1, 9, and 12 (if you count intervening blank lines) are code comments that summarize the functionality of the sections of the script. On line 2, the first of two conditionals in our calculation script begins. In it, we put our q1answer variable to use. Notice that because this code is attached directly to our movie's timeline, we aren't required to supply the location of the variable q1answer.
if (q1answer = = 3) {
The keyword if tells the interpreter we're about to provide a list of statements that should be executed only if a certain condition is met. The terms of that condition are described in the parentheses that follow the if keyword: (q1answer = = 3), and the opening curly brace begins the block of statements to be executed conditionally. Therefore, line 2 translates into, "If the value of q1answer is equal to 3, then execute the statements contained in the following curly braces."
But how exactly does the condition q1answer = = 3 work? Well, let's break the phrase down. We recognize q1answer as the variable in which we've stored the user's answer to Question 1. The number 3 indicates the correct answer to Question 1 (movie clips first appeared in Flash version 3). The double equals sign (= =) is the equality comparison operator, which compares two expressions. If the expression on its left (q1answer) equals the one on its right (3), then our condition is met and the statements within the curly braces are executed. If not, our condition is not met, and the statements within the curly braces are skipped.
Flash has no way of knowing the right answers to our quiz questions. Checking if q1answer is equal to 3 is our way of telling Flash to check if the user got Question 1 right. If he did, we tell Flash to add 1 to his total score as follows:
totalCorrect = totalCorrect + 1;
Line 3 says, "Make the new value of totalCorrect equal to the old value of totalCorrect plus one," (i.e., increment totalCorrect). Incrementing a variable is so common that it has its own special operator, ++.
So, instead of using this code:
totalCorrect = totalCorrect + 1;
we normally write:
totalCorrect++;
which does exactly the same thing, but more succinctly.
At line 4, a curly brace ends the block of statements to execute if our first condition is met:
}
Lines 5 through 7 are another condition:
if (q2answer =  = 2) {
  totalCorrect++;
}
Here we're checking whether the user answered Question 2 correctly (MP3 audio support first appeared in Flash 4). If the user chose the second answer, we add 1 to totalCorrect using the increment operator ++.
Because there are only two questions in our quiz, we're done tallying the user's score. For each question that the user answered correctly, we added 1 to totalCorrect, so totalCorrect contains the user's final score. The only thing left is to show the user his score in an on-screen text field. In Flash MX, we can create a text field directly with code as follows:
this.createTextField("totalOutput_txt", 1, 150, 200, 200, 20);
Here, the keyword this refers to the main movie timeline, which is where we want the new text field to appear. We then execute createTextField( ), which tells Flash to put a new text field named totalOutput_txt on depth 1, at an x-position of 150 and a y-position of 200, with a width of 200 and a height of 20. We can display the value of totalCorrect in the new text field like this:
totalOutput_txt.text = "Your final score is: " + totalCorrect + "/2";
As a new programmer, you're not expected to understand entirely how this code works. But it should give you a glimpse of the exciting stuff ActionScript can do. Try exploring on your own by changing, say, the width and height of the text field, or the text displayed in it. Text fields are covered exhaustively in the ActionScript Language Reference, under the TextField class.
Well,
that's it. Our quiz is finished. You can check
whether the quiz works by using Control ![]() Test
Movie. Click on the answers in different combinations to see if your
quiz is keeping score correctly. You can even create a restart button
by making a button instance named restart_btn and
adding the following code to frame 1 of the
scripts layer:
Test
Movie. Click on the answers in different combinations to see if your
quiz is keeping score correctly. You can even create a restart button
by making a button instance named restart_btn and
adding the following code to frame 1 of the
scripts layer:
restart_btn.onRelease = function ( ) {
  this._parent.totalOutput_txt.removeTextField( );
  this._parent.gotoAndStop("init");
}
Because totalCorrect is set to 0 in the code on the init frame, the score will reset itself each time you send the playhead to init.
If you find that your quiz isn't working, try comparing it with the sample quiz provided at the online Code Depot.